Crafts for Kids: Papier-Mache Bowls
I recently bought the book Handmade Home by Amanda Blake Soule. She has some great projects in the book but the one that caught my eye as something that the girls and I could do together was Calvin's Papier-Mache Bowl. We just finished our second set of bowls in two weeks. They are lots of fun to make and they have been keeping us busy. Since you have to wait until they dry between each step (making, priming and painting) we have been spending lots of evenings hanging out and creating together.
Here's what you need to make these bowls:
1. Newspaper cut into strips of about 1" by 6"
2. A bowl for a mold
3. Tin foil to cover the bowl
4. Papier-mache paste. We used Amanda's recipe for homemade paste. All you need to do is put 1/2 cup of flour, 1 tablespoon of salt and 2 1/2 cups of water in a saucepan. Cook the mixture on medium heat for about 10 minutes until it thickens. Add one drop of clove oil at the end to prevent the glue from getting moldy. Let it cool and stir before using. Unused glue can be stored in a jar in the fridge for one week.
5. Paint brushes
6. Gesso
7. Acrylic paint
Here's how you make the bowls:
1. Cover the bowl that you are going to use with a piece of tinfoil. Make sure that it's smooth and turn it upside down before you begin.
2. Take some of the glue and spread it on a piece of the newspaper strips with a paint brush then apply it to the bowl.
3. Make sure that you do about 5 layers of paper or else the bowl will not have enough body. It will take anywhere from 12 to 24 hours to dry.
4. When the bowls are dry take the papier-mache bowls off the molds and then peel off the tin foil.
Here's how you paint the bowls:
1. Apply a thin layer of gesso as a base coat and let it dry.
2. Apply a thin layer of acrylic paint and let it dry
3. Apply another layer of acrylic paint and let it dry.
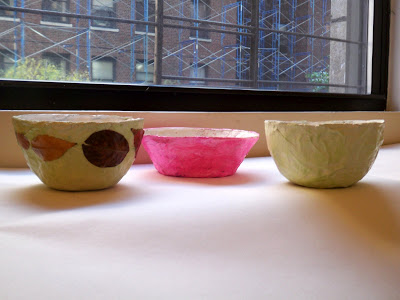 We painted our first set of bowl with washable paint because that was what we had in our house. T actually put some fall leaves on one of her bowls. All we did was Mod Podge them on the bowl and when it was dry added another layer of Mod Podge to it. I think it looks really cute.


Our second set of bowls definitely came out better. We bought acrylic paints at our new neighborhood Michaels (yeah!) and it really made a difference in how the bowls looked (although you can't really tell from these pictures). T ended up randomly applying her paint brush to her bowl after the purple she was applying to the inside of the bowl got on the outside by mistake. I think it came out great. It looks kid of tie dyed. I think that we had a better sense of how to actually apply the papier-mache the second time around so the bowls looked smoother. I am sure that the next time we do it they will come out even better.
Here's what you need to make these bowls:
1. Newspaper cut into strips of about 1" by 6"
2. A bowl for a mold
3. Tin foil to cover the bowl
4. Papier-mache paste. We used Amanda's recipe for homemade paste. All you need to do is put 1/2 cup of flour, 1 tablespoon of salt and 2 1/2 cups of water in a saucepan. Cook the mixture on medium heat for about 10 minutes until it thickens. Add one drop of clove oil at the end to prevent the glue from getting moldy. Let it cool and stir before using. Unused glue can be stored in a jar in the fridge for one week.
5. Paint brushes
6. Gesso
7. Acrylic paint
Here's how you make the bowls:
1. Cover the bowl that you are going to use with a piece of tinfoil. Make sure that it's smooth and turn it upside down before you begin.
2. Take some of the glue and spread it on a piece of the newspaper strips with a paint brush then apply it to the bowl.
3. Make sure that you do about 5 layers of paper or else the bowl will not have enough body. It will take anywhere from 12 to 24 hours to dry.
4. When the bowls are dry take the papier-mache bowls off the molds and then peel off the tin foil.
Here's how you paint the bowls:
1. Apply a thin layer of gesso as a base coat and let it dry.
2. Apply a thin layer of acrylic paint and let it dry
3. Apply another layer of acrylic paint and let it dry.
 We painted our first set of bowl with washable paint because that was what we had in our house. T actually put some fall leaves on one of her bowls. All we did was Mod Podge them on the bowl and when it was dry added another layer of Mod Podge to it. I think it looks really cute.

Our second set of bowls definitely came out better. We bought acrylic paints at our new neighborhood Michaels (yeah!) and it really made a difference in how the bowls looked (although you can't really tell from these pictures). T ended up randomly applying her paint brush to her bowl after the purple she was applying to the inside of the bowl got on the outside by mistake. I think it came out great. It looks kid of tie dyed. I think that we had a better sense of how to actually apply the papier-mache the second time around so the bowls looked smoother. I am sure that the next time we do it they will come out even better.

Comments
I used to make paper mache puppets. Blow up a balloon and start putting layers of paper mache on top of it. You can mold ears and a nose, even eyebrows if you want. Then, when it is dry, you pop the balloon.
You can make the body by sewing clothes (on your new sewing machine). Slip the clothes over your hand and stick it into the head. I forget how I attached the head to the clothes, but I am sure you can figure something out. I used pipe cleaners for glasses.
Turned a table sideways and sat behind it (between the legs) for a stage. Did this when a group of us had to make a presentation to our "Problems in Education" class when I was getting my masters. We got an A.
Shows that puppets are fun at any age.
Mom
If you enjoy paper mache. I came across a new blog were the mom & child made dolls. I am building my paper stash so that me & my girlets can make them: www.growingupcreative.com
I totally remember doing that puppet project and I remember doing it with you but I always thought we did it in Miss Hayes' class.